Although it isn’t necessary to track to your food down to every detail or even count calories when doing 90/10 Nutrition, some people LOVE visual tools, data, and tracking. So, I wanted to go through how tracking clean eating with MyFitnessPal can be done along with 90/10 Nutrition.
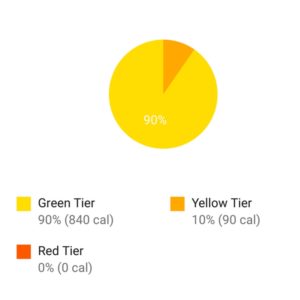
If you set up the app the way we show you in this blog, you’ll even be able view a pie chart that shows how much green tier, yellow tier, and red tier you’ve had for the day!
You’ll also be able to see how many calories you’ve eaten so you can see if you are way off track with calories (which is possible), and you’ll be able to see a breakdown of your macros (carbs, fat, and protein). We don’t typically focus on either of these things but they can be useful for diagnostics if you are hitting a plateau or not reaching your goals.
Setting Up MyFitnessPal
Step 1: Download the App
Start by downloading the FREE app to your phone or tablet. There is also a desktop version but we’ll be showing screenshots for how to set this up on your mobile device.
There is a premium (paid) upgrade available in the app but you DO NOT need that to do what we are showing in this blog. You can feel free to upgrade to the paid version for more features but you don’t need it for this tutorial.
Step 2: Create your profile
Use the Sign Up button to start creating your profile. MyFitnessPal (MFP for short), will walk you through the setup process.
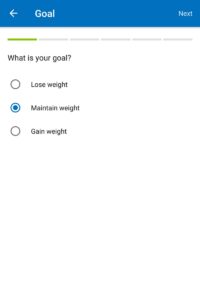
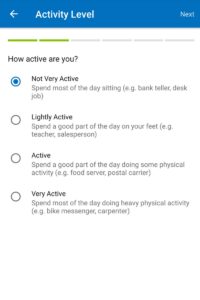
They will use the information you enter to create a plan for you. Since you are doing 90/10 Nutrition, you will ignore the plan they create for you. You should already have a basic calorie calculation from the Academy. If you were to put in a weight loss goal and activity levels in MFP, it would create a plan for you that includes a calorie deficit. For this reason, we usually don’t put in weight loss goals or activity levels. The numbers you get from 90/10 already take this into account! So, don’t worry, you’ll still be able to lose weight even though we are putting “maintain weight” as the goal in MFP.
See the images below to see how we recommend entering the information.
Once you have your account set up, you can go into your goals and change your calorie goal to the one you got from the 90/10 Academy. Just click on “goals” from the main app menu and then click “Calorie and Macronutrient Goals”.

Recommended Settings
Step 3: Renaming Your Meals
To track your food for 90/10 Nutrition, you’re going to need to customize the names of the meals in your food diary.
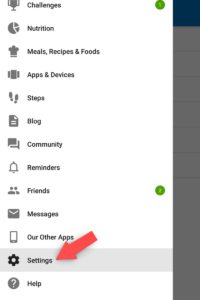
You can see the images below to follow these directions visually as well.
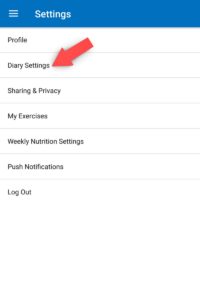
♦ Click on the menu in the upper left
♦ Click on “Settings”
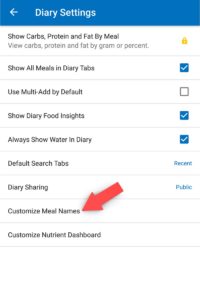
♦ Click on “Diary Settings”
♦ Click on “Customize Meal Names”
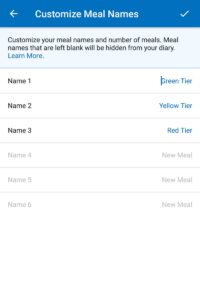
♦ Name Meal 1 “Green Tier”
♦ Name Meal 2 “Yellow Tier”
♦ Name Meal 3 “Red Tier”
♦ Make sure the rest of the meals are blank

Customizing Meal Names
Step 4: Entering food in the diary
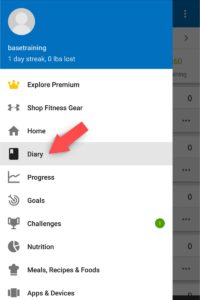
Now you’ll need to enter your food intake into the appropriate sections in your food diary within the app. You can get to your diary by clicking on “diary” in the main app menu.
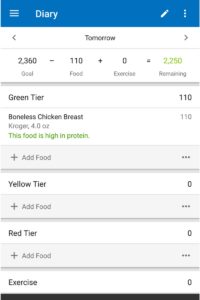
You should see that the sections of your diary are now showing the customized names you set up in the last step. Now, you can simply add any green tier foods you eat during the day to the “green tier” section and so on. Example: If you eat some uncured bacon, you would add that to the yellow tier section by clicking on “add food” right below that section heading. If you eat an apple, you would add that to the green tier section by clicking on “add food” right below that section heading.
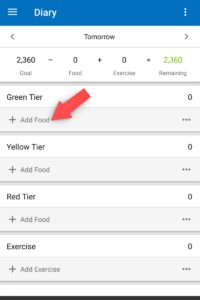
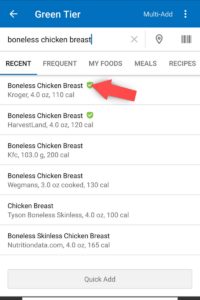
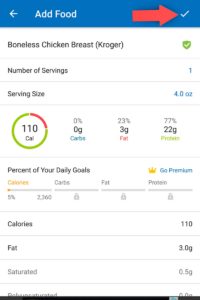
Here is a more detailed example using chicken breast (see the images below to go along with this section):
♦ Click on the menu in the upper left
♦ Click on “diary” in the app menu
♦ Click on the “+ Add Food” under the Green Tier Heading (since chicken breast is on the green tier)
♦ Type “chicken breast” or something similar into the search bar
♦ Click on the item in the search results that matches what you ate
♦ Change quantity or serving size as appropriate for what you consumed
♦ Click on the checkmark to save the item
♦ Repeat this process for every item you eat

Example Food Entry

Step 5: Viewing the charts
Once you have food entered in your diary, you can easily view a pie chart or a list of various data.
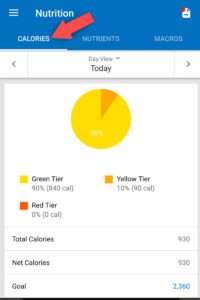
The most useful chart is the calories chart, which shows a pie chart of what percentage of your total calories came from each category in your diary. Since you have your categories set as the three tiers, this chart shows you how much of your daily intake comes from each tier (as long as you entered your food under the correct categories).
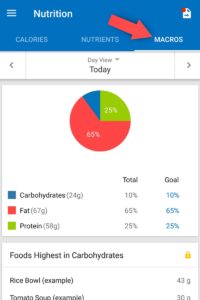
You can also views a pie chart showing what percentage of total calories came from each macronutrient (fat, carbs, protein).
To get to these charts, do the following (see images below for a visual walkthrough):
♦ Click on the menu in the upper left
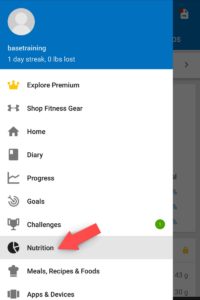
♦ Click on “nutrition” in the app menu
♦ To view the chart showing the green, yellow, and red tier percentages, make sure you are on the calories tab
♦ To view the chart showing macros make sure you are on the macros tab
NOTE: You can also change your goal macronutrient percentages by clicking on “goals” in the main app menu and then “Calorie and Macronutrient Goals”. In normal 90/10, we don’t care about macronutrients, but if you are doing a keto version of 90/10 (available in our member area), you will care about macros.



Comments (5)
This helps so much! Thank you!
Thanks! This helped so much! Just got mine all setup!
Thank you. Very helpful!
Whoa! This might me actually want to use MFP. I’ve loathed that app for a long time.
Haha! That thing can be a bit touchy. I love using it this way though. Let us know if you need any help, Kyle.